Friday, March 29, 2013

Recycled Notepads


In my office, we occasionally end up with large stacks of paper.  One side has been used, filled with typed information.  The other side is still clean.  Even though our office recycles, I still get a little twitchy when I see all that paper going into the bin, when I know a simple way to use the clean areas of paper and THEN dispose of it in the recycle bin.  I know, it’s not much.  But every little bit helps.


Some may argue that this is an awfully simple craft, and not the most attractive presentation.  My response would be that this blog is about using what I have on hand to make something new.  It doesn’t HAVE to be pretty.  And hey, if other people who do this want to embellish their notepads, that’s great!  Bling them up, add a bow or beads or anything else.  Functional cuteness is splendid, it’s just not my goal with this particular project.


That and I’m doing it during my down time at the office.  I tend to leave my ribbons and glitter at home.  Although I do have these cute little adhesive-backed rhinestones…hm…


So anyway, what did I use for this?


-A stack of white copy paper

-Clear school glue gel (white glue or Mod Podge would work just fine too)

-Scissors

-Large binder clips

-A flat object, like a popsicle stick, to smear glue with (I used the back of a letter opener, because that’s what I had on hand)


First, I took a few sheets of paper at a time, and folded them in half this way:


Then, I folded them in half THIS way:
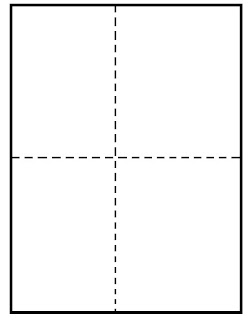
I know, it's not in the middle. I eyeballed it.


With the papers still folded, I used the scissors to carefully cut the folds, directly on the seams.  I ended up with four pieces of paper (per full size sheet) approximately equal in size.  Remember that I said above I used a few sheets at a time.  This was to expedite the process.  Not too many though, because it’s tough to cut through too many sheets all together.


Next, I went through all the paper, turning it so that the blank sides were all face up, and the written sides were face down.  Like a big deck of cards.


I took the large binder clips and secured each side of the paper stack along what I decided would be the top of the notepad.  


I applied glue to the top of the notepad.  I spread it evenly using the flat end of a metal letter opener.  I used enough to saturate the paper into the nooks & crannies, but not so much that it would be drippy.  The binder clips were handy here, because they kept the notepad raised off of the table while the glue dried.  It probably only needs a few hours, but I left it overnight.


And voila!  I have several fresh notepads to jot down important stuff.  Names, phone numbers, doodles,  poetry, or whatever.   


Thursday, March 7, 2013

Homemade Suet

The birds around here are hungry critters in the winter months.  I had no idea until I started feeding them with my DIY bird feeder from a few blogs back.  I loved seeing all the smaller birds.  Chickadees, brown creepers, nuthatches and tufted titmice, with a few cardinals.  But I was missing the larger birds.  I love blue jays, and hadn't seen many of them at all.  I recalled that I put up a pre-made seed bell a few months ago, and our large pileated woodpeckers loved it.  In fact, LOTS of birds enjoyed the seed bell.
So my husband and I found ourselves at White's Mill, our local seed & feed store.  We picked up a big bag of bird seed, some shelled sunflower seeds, and a suet cake.  I was told by the clerks which one would draw the woodpeckers.
I don't have a cage for suet, so I hung the little square cake in a plastic mesh bag that used to hold oranges.  For days, weeks, the cake was ignored.  Then one morning I noticed that it was gone.  Some clever squirrel had made off with it, no doubt.
Finally, I decided I was just going to make my own suet for the birds.  So I did a little online research, and came away with some good information.  The resulting suet was a hit, I guess.  Because I put it out before dark on Saturday.  On Sunday morning around 9am, when I looked at it next, it was GONE.  Not a morsel left!  So I decided that it would be my craft for the week.  Why not?  Does it really classify as a craft?  I think so.  My husband told me that my snow cream was not a craft, and I disagree.  I used materials on hand to make something that had a purpose.  Just because its purpose was to be tasty didn't make it any less of a craft in my mind!  True, one could argue that it isn't.  I guess we'll just have to agree to disagree.  Along the same lines, perhaps homemade suet is not a craft in some peoples' minds.  Maybe I just need to change the title of my page to "52 Weeks of Arts, Crafts & Other Random Stuff" to cover all my bases.
So how did I make the suet?  It was so incredibly easy.  Here's what I used:

*Large mixing bowl
*Lard
*Chunky peanut butter
*Bird seed
*Large spoon 
*Yarn (or cord, or string, whatever is handy)

Breakfast of champions, if you happen to be a chickadee.
I did not use a published recipe for this, although I browsed several.  I didn’t measure anything.  I just threw it together.  If I had to guess, I’d say I used about 3/4 cup of lard, and a half cup of chunky peanut butter.  I didn’t melt anything.  The first time I made this, I melted the peanut butter.  I don’t think it made a difference.  When I made it this time, I didn’t heat anything at all.

I spooned the lard into the mixing bowl first & mashed it up a bit.  Then I added the peanut butter, mixing it until it was well-blended.  It just looked like a lighter shade of peanut butter, really.  

Lard & peanut butter.  Yummy.
Then I started mixing in the bird seed.  I didn’t add it all at once.  I put some in, mixed it in well, then added some more, mixed it in, etc.  At this point mine was about the size of a large orange.  I continued adding seed until it looked like a solid ball of waxy seed.  The mixture was firm enough that I could shape it into a ball using the spoon.  Lard smells nasty and it takes some work to get off of your hands, so I suggest a pair of gloves if you have to handle it at this stage.  
Suet ball before adding the seed coating.

Next, leaving the seed ball in the mixing bowl, I added seed as a top layer, using my hands and the spoon to stick seed firmly onto the ball.  I turned it, coated it, turned it, etc., until the ball was completely covered in seeds.  Then I put it in the freezer.

I don’t have a real estimate on how long to freeze the suet.  I just imagine it helps to keep it from going sploot on the ground.  I left it in overnight.
I cut about three feet of yarn, although I don’t think I used nearly that much, and proceeded to wrap it around the suet ball, criss-crossing and tying it several times to secure it.  Using the rest of the yarn, I made a loop and hung it outside.
This suet ball has lasted much longer than the first one.  I believe this is due, at least in part, to the fact that I tied it fairly securely, and I froze it for a much longer time.  I only left it in the freezer for a few hours the first time, making it more susceptible to going sploot.  The first attempt with yarn was a little flimsy too.  I strung the yarn through the middle of the suet ball, which didn’t seem as sturdy.  Or, I could just say that the suet isn’t as good this time.  But it’s virtually the same, so I don’t think that’s the case.  I’m not going to try it to find out.  I have seen nuthatches and chickadees enjoying it, at least.  Next time I may add dried cranberries and more nuts.


Yay!  Happy birds!


Plarn Thing


My plarn adventure started with the desire to make something useful out of things I have on hand, items that I have in abundance.  I found a Pinterest pin that I wanted to use as a reference for something similar, if not exactly the same.
Here is the link to that tutorial. Practical and cute!
 Make a basket out of plastic bags! 
I thought about the neverending pile of plastic bags we’ve accumulated from trips to the grocery.  I don’t throw them out.  That seems so wasteful.  It’s handy to have a few plastic bags around, anyway.  I reuse them often, whether it’s to take something to work on the fly, or to return items to people or to the store, or most recently, as a trash bag to have right on hand when I was sick and using a lot of tissues.  I always use them for waste basket bags.  BUY the mini trash bags at the store?  Are you kidding?

But as convenient as they are to have, one can accumulate too many.  I’ve been noodling around with the idea of having all reusable bags when we go to the store, but I haven’t yet committed to that.  It’ll happen, and I don’t have any good excuses.  Just bad ones.  Walking around a grocery store with several bags on your person would feel awkward, for one thing.  Who cares?  I don’t.  Sort of.  Well…that and it takes forethought.  Something I tend to lack.  But I look at the reusable bags they have for sale with a hint of guilt combined with indignation.  They want to SELL me these reusable bags?  Ha!  I could MAKE those.

But I don’t.  That’s going to change.  It will.  I don’t know how soon, but it will.

I started thinking about what I’d seen on Pinterest.  Why couldn’t I use the large knitting loom to make a plarn basket?  Well, sure!  So I got to work.

Here’s what I used:
*Lots and lots and LOTS of plastic grocery sacks
*Scissors
*Large round loom
*Loom pick

This process is a little time consuming.  Because unlike regular loom knitting with soft & fuzzy store bought yarn, you have to make the raw supply first.

To make plarn:

Fold the plastic bag in half. 
Fold it in half again. 
Cut off the bottom of the bag. 
Cut off the top of the bag.

Cut the remaining folded portion into strips.  Mine were about 2 ½ fingertips wide.  Yeah, I wasn’t terribly precise. 

I made a large stash of these little folded-up strips before I got started.  I think I used about 5 bags before I even went on to the next stage of the process.  It’s easier to do it this way so you can work for a while before you have to stop knitting and go back to cutting strips.

Start putting your plarn together.  To do this, take two of the folded-up strips.  Unfold them.  Make a lark’s head knot.  I didn’t know what that meant, initially, so I had to do a little research.  Then trial and error.  Describing it is difficult, so I won’t try. It’s very simple to do, just tough to explain. 
You’ll quickly start accumulating enough plarn to roll into a ball.  Once you feel you have enough, it’s time to load the loom.  Then it’s exactly like anything else you make on a round loom.  I’ve posted videos of that before.  You will probably run out of plarn before the project is done.  Just make more, adding one piece at a time to the end of your roll until you have a big ball of it again.

So how did this work out?  
 
It was okay, not bad for a first attempt.  It isn’t sturdy enough to stand on its own with much stability, so it looks sort of like a rolly brim hat made with plastic bags.  I couldn’t decide if I wanted it to have a handle once I realized it wouldn’t be a proper waste basket.  So it’s just…sort of…a thing.  A basket/bag thing.  At least, it is right now.  It can be used for any number of purposes.  Do you know what I want to try?  I’d like to iron it to see if it makes a solid and sturdier material, like other projects I’ve seen on Pinterest.  Unfortunately, I don’t own an iron.  Or if I do, it’s in storage in another city.

So what can I do with this?  It could be a shower caddy, because it’s waterproof and has little holes for drainage.  Add a handle and it can just be a bag, for anything, made from bags.  How fitting. Right now, it's holding extra yarn.

 
I haven’t given up on making stuff out of plarn.  I get excited when I end up with plastic bags of different colors.  My first project was very brown, with a few flecks of blue from the writing on the bags. Not an attractive brown, either. Sort of the color of raw meat when it’s lost its pink.  Blah.  Next time I want to make something more vibrant.  But obtaining a large number of “pretty” plastic bags to work with is not as simple as I would like.  It’ll take some time. 


What’s next?  Lots and lots of things of a crafty nature!  Yay!

Monday, March 4, 2013

Fuzzy Scarf on a Round Loom

Over the past few years, I've made several hats successfully using my loom knitter.  It's so simple, and it's so satisfying to make something out of nothing.  Or, well, something out of a pile of yarn that starts out as nothing really useful.  I still have not mastered the art of the long loom knitter.  I've watched several videos, and I can't quite grasp all the steps.  I'm sure it's very simple, like regular knitting or crocheting.  But somehow, something I haven't been able to conquer.  So while I've made hats without difficulty, I had never made a scarf.  I assumed I would need to use the long knitter for that. 

Silly me.  I looked at the smallest round loom one day and realized...I can make a scarf with THAT!  duh. Just one long continuous tube, and voila!  Lookie, a warm thing to put around your neck!  Yay!  Honestly, the thought has crossed my mind before.  Then I forget about it.  I go back to thinking I need the long loom for scarves.  I moan about not being able to make scarves.  Then one day it dawns on me.  Then before I get out the yarn to try it, I forget again.  It's an endless cycle of memory retrieval and loss, not unlike Dory in Finding Nemo

I've been more interested in scarves lately.  They're all the rage at the office.  I'm not the most sophisticated girl, and I never really mastered the fine art of style and accessorizing.  Layers?  Complementary colors?  Wha?  I was stellar at layering plaid flannel over a band t-shirt back in college, but past that, I'm pretty clueless.  Ah, the good old days of grunge fashion...It was so much simpler to be in style when it only required apathy and a pair of combat boots. 

Anyway, back to scarves.  Several of the classy ladies at work accessorize with pretty scarves.  They're silky, usually with simple designs and varying shades of the same color, occasionally with a little gold or silver thread mixed in.  Lovely!  I'm so envious when I see them. My husband has a friend who actually creates them from scratch.  And when I say that, I mean she makes and dyes the fabric.  When working with wool?  Yeah, she sheers the sheep.

Here's an example of some of her stunning work:
 
joydidit Gardens In Bloom Arashi Shibori Scarf 

Isn't it gorgeous?  I want one!!

Ok, but this is not that.  This is made with yarn.  This is just a warm fuzzy scarf in a dark teal.  I'm still working on how to make a work appropriate scarf with materials I have on hand.  I don't have a huge fabric stash, and cutting up existing clothing is difficult for me, even when said clothing is sort of hideous or ill-fitting or stained.  And I keep fretting over different aspects of that.  Having a large enough sample of fabric to make a full scarf, that would be tough.  And the edges.  Would they fray?  Probably.  Eep, sewing.  Ergh...But the more I see these wonderful scarves, the more I want to try to make something like it myself.  Not that it would be the same as the ones I've seen, but still beautiful in its own way.  It'll happen.  I just need to keep telling myself that.

What I used:
*Knifty Knitter Flower Loom
*Loom pick
*Loom needle
*Scissors
*Feathered yarn
*Black string/cord/thread

How did I make this scarf?  Well, you already know that it was on a loom.  

Here is a video that might help should you decide to try this yourself:


I decided to use the smallest Knifty Knitter loom, the flower loom.  I used a heavy black thread, more like string, really, and a sort of feathered yarn.  I didn't use two strands of the feathered yarn because 1. I didn't have enough, and 2. I didn't want it to be super fuzzy anyway.  I wanted a more subdued fuzziness.  

I started out on the loom the same way I would if I were making a hat.  Wind the yarn around each peg.  The cross should be in the back, the loop in the front (if that makes any sense whatsoever).  Wind it around twice, with the second row above the first one.  Take the loom pick & pull the bottom loop over the top loop and then over the peg. Do that a lot.
Really, it's better if you look at the video.  I'm totally awful at giving instructions.  I have to have pictures.  Too bad my phone is having problems sending photographs to my email at the moment.  *sigh*

 Instead of ending the piece at a hat length tube, I kept going.  And going, and going, and going.  Until I made a very long tube.  At the end, I cast off the loom the same way I would with a hat, except I didn't pull the yarn taut at the end.  I made a knot to secure it.  That was it.

I could use a larger loom for a wider scarf.  But that would take so much yarn, I'm afraid I would run out.  Maybe I'll get some new yarn to make a scarf, and I just won't include it in this blog (much like the wedding card box I still need to post).  

Now, what to post next...there are several options, just need to blog something.  There is the plarn...hm...